Gone (well almost) are the days when you needed to wait around for the Googlebot to crawl your site, discover your new or freshly updated pages, and then proceed to indexing them. Initially released in 2018, and reserved for job posting URLs, Google’s Indexing API allows site owners to directly notify Google when they have added or removed pages on their site.
The Indexing API can be used to:
- Update URLs in the index and keep search results up-to-date for higher-quality user traffic.
- Remove any old or unnecessary URLs from the index.
- Send batch requests to reduce the number of times you call the API.
As you may know, in Indexing API QuickStart, Google recommends using Indexing API instead of a sitemap, because in comparison to sitemaps, the API receives requests to update the page or publish a new page faster.

In this article, we will look at how to use Python for building a script in order to send your site’s URL index requests to Google in bulk and also ask Google to crawl your pages faster.
As a bonus, you can also use this script to send requests for pages you have updated or want to remove from Google.
Libraries we’ll need
To build this script in Python we will use Google Colab and we will also need the following libraries:
- oauth2client
- GoogleApiClient
- httplib2
- JSON
- Google Colab
- OS
To install these libraries on Google Colab, you can use the following command:
!pip install oauth2client
Or, if you wish to install the libraries in Windows, you will need to enter the following command in ‘Command Prompt’ or in ‘Terminal’ if you are using MacOS:
pip install oauth2client
Using the libraries
After installing the necessary libraries, to use and call them, you will need to use the following codes:
from oauth2client.service_account import ServiceAccountCredentials
from googleapiclient.discovery import build
from googleapiclient.http import BatchHttpRequest
import httplib2
import json
from google.colab import files
import os
Preparing the URLs
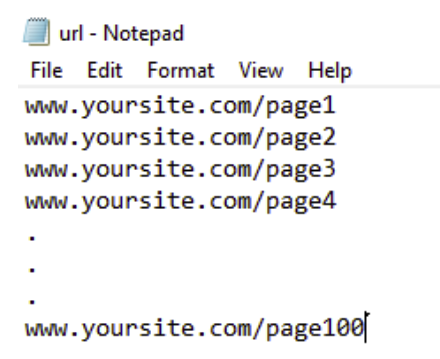
Next, we need to copy our URLs in a text file from which you can inform Google of your edits, new releases and deleted pages. Keep in mind that you are limited to 100 links or less per day when using the Indexing API. The text file should look like this:
In Google Colab, you can use the following code to upload and call the corresponding text file of your URLs:
uploaded_file = files.upload()
After that, we need to create a dictionary and prepare the URLs for sending requests. We can do so using the following code:
list=[]
for filename in uploaded_file.keys():
lines = uploaded_file[filename].splitlines()
for line in lines:
list.append(line.decode('utf-8'))

requests ={}
for i in list :
requests[i]="URL_UPDATED"
print(requests)
It is necessary to mention that in the code, for updating or publishing new content, the needed dictionary will be made. If you need to remove URLs, you could simply use the URL_DELETED command instead of URL_UPDATED.
Creating and activating Indexing API
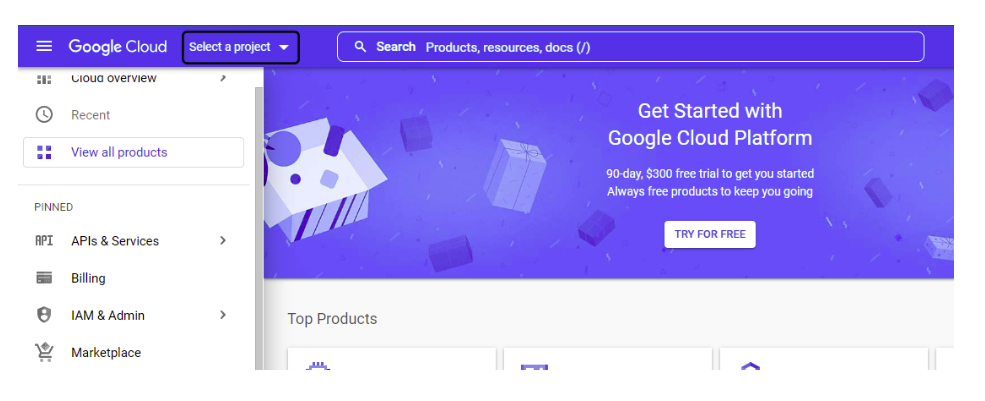
To create and activate the API, you will need to go to the Google Developer Console, then click on ‘Select a project’ and use the option, ‘New project’ to create a new project.
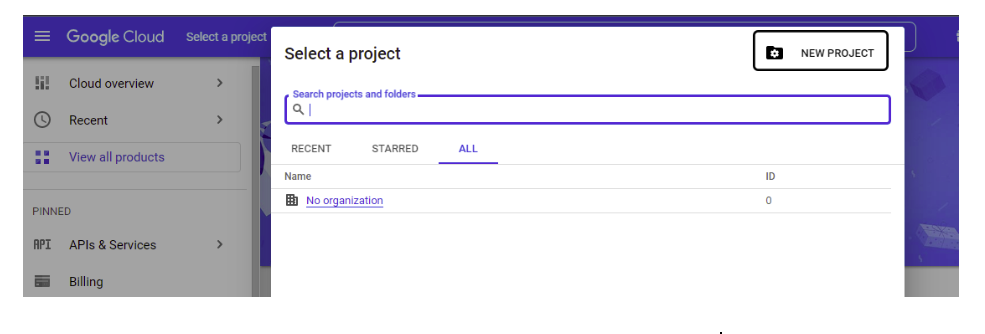
Then, you will need to pick a name for your project and select ‘Create’.
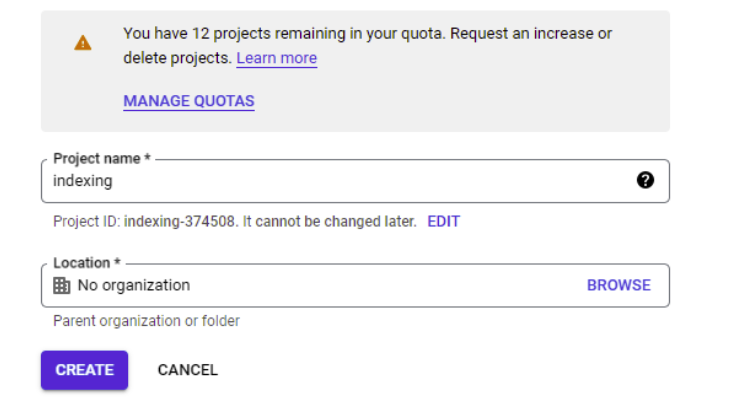
After creating the project, you will then need to select it from the project section of the menu, then select IAM & ADMIN from the left menu and finally pick ‘Service Accounts’.
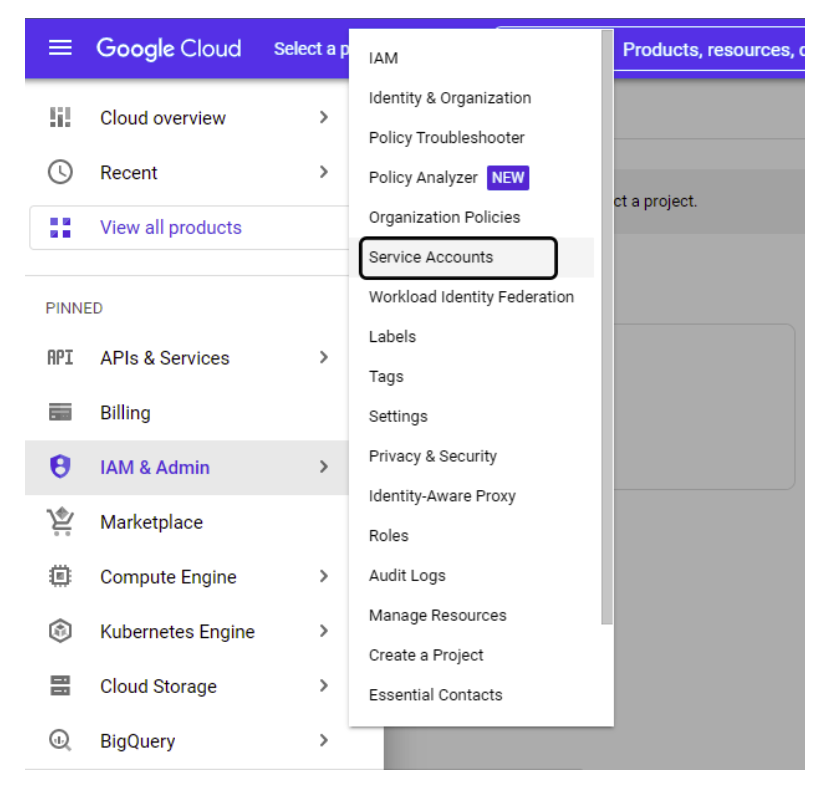
After this step, click on ‘Create service account” and proceed to create your account. In the first section, pick a name for your account then click on ‘Create and continue’. Once completed, you can move on to the second step.
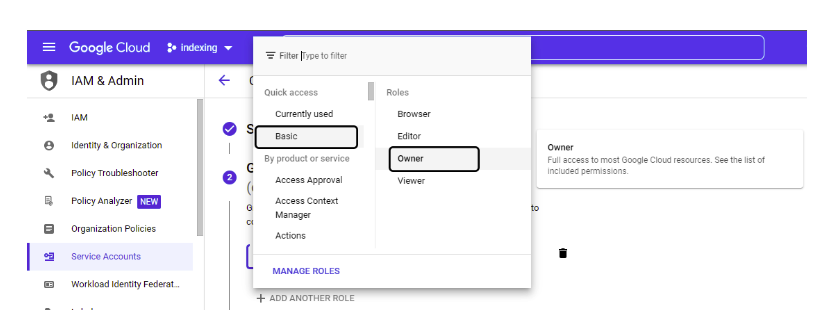
In the section, ‘Grant this service account access to project’, pick a role for your account and make sure to pick ‘Owner’ from the Quick access menu, followed by the ‘Basic’ section. Then, click on ‘Continue’ and in the next step you won’t need to change anything, just click on ‘Done’.
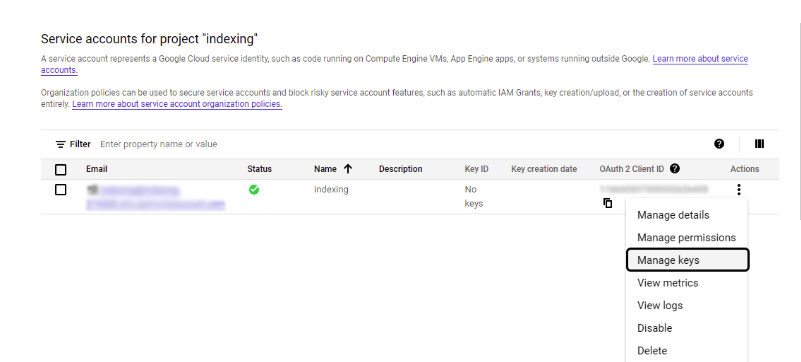
On the opened page, save the email address that is in the ‘Email’ field, because we are going to need it later. Click on ‘Actions’ and then click on ‘Manage Keys’.
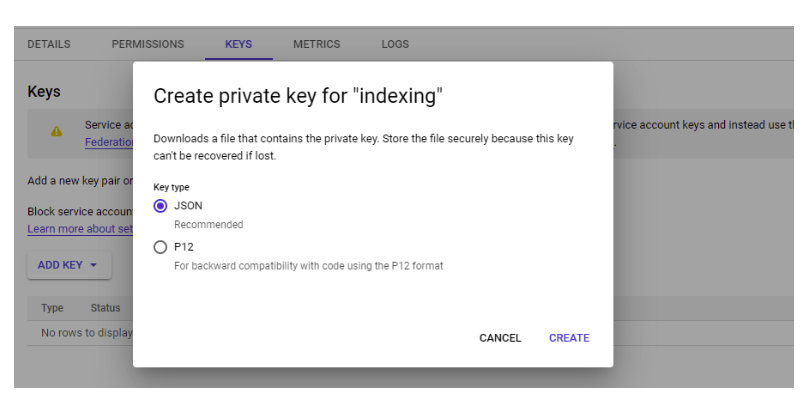
In the opened page, from the ‘Add Key’ section, click on ‘Create new key’ and then create a JSON file and save the downloaded file.
Now is the time to activate the Indexing API; to do so, from the ‘APIs & Services’ section, click on ‘Enable APIs & services’.
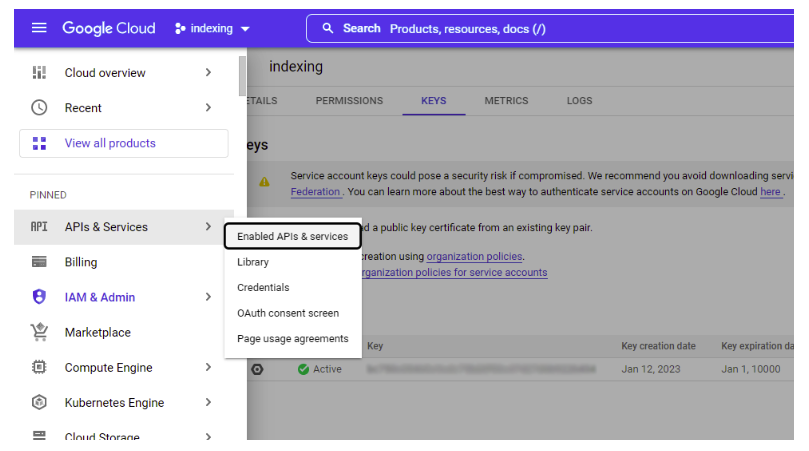
On the next page, search ‘Indexing API’. Once you have selected it, click on ‘Enable’ to activate your API.
Adding an email to Search Console
To use the Indexing API, you need to create an access account for it in your website’s Google Search Console. To do so, you need to open your Google Search Console and from the ‘Settings’ section, click on ‘Users and permissions’ and then add a new user from the ‘Add user’ section. When the new page opens up, enter the email you saved earlier and change its permission to ‘Owner’.
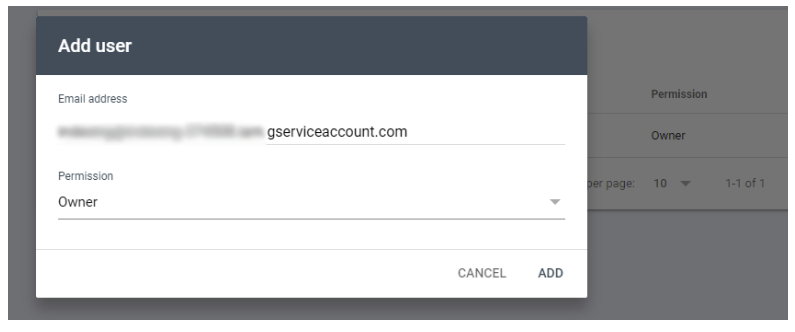
If you didn’t save your email, you will just need to go back to service accounts and copy the email.
Your email should also be in the JSON file that you downloaded earlier and you can access it by opening the file and looking for ‘client_email’.
[Case Study] Find and fix indexing issues
Uploading the JSON file
To upload the JSON file in Google Colab, you will need to use the following code:
JsonKey = files.upload()
Then, you will have to find the path to which the files have been uploaded. This can be done using the OS library. You can use the following code and to make sure that the file has been uploaded, you will need to use an ‘if’ at the beginning:
if JsonKey:
path_to_json = '/content'
json_files = [pos_json for pos_json in os.listdir(path_to_json) if pos_json.endswith('.json')]
path = "/content/" + json_files[0]
Authorizing requests
As you pay be aware, Google has announced that in order to use Indexing API, our program and script needs to use OAuth 2.0 to authorize requests.

To use OAuth 2.0 and send requests, you will need to search for some information and to get it, you should use the following link from the Indexing API. For more information on this topic, you can refer to the Authorize Requests page.
SCOPES = [ "https://www.googleapis.com/auth/indexing" ]
Sending requests
Google has explained in Using the Indexing API page that for sending requests, we need to use an end point which has the following conditions and the requests should be sent using the post method:
If you want to send a single request:
ENDPOINT = "https://indexing.googleapis.com/v3/urlNotifications:publish"
If you want to send batch requests:
ENDPOINT = "https://indexing.googleapis.com/batch"
In this script, we send the requests one by one, but the difference is that we have already made a dictionary that contains 100 URLs so all the requests are sent at once.
Now, we need to make the variables of ‘Authorize credentials’ and we do so by using oauth2client library and ServiceAccountCredentials to create the variables using the following codes:
credentials = ServiceAccountCredentials.from_json_keyfile_name(path,scopes=SCOPES)
http = credentials.authorize(httplib2.Http())
In the next step, we will build service tools and then build a function. After that, we handle the final request. For more information on how the codes work, you can read the Class BatchHttpRequest page.
The final codes in this section look like the following:
service = build('indexing', 'v3', credentials=credentials)

def index_api(request_id, response, exception):
if exception is not None:
print(exception)
else:
print(response)
if JsonKey:
batch = service.new_batch_http_request(callback=index_api)

for url, api_type in requests.items():
batch.add(service.urlNotifications().publish(
body={"url": url, "type": api_type}))

batch.execute()
After sending the request, if everything was done correctly, requests will be printed like the example below:

You can check the final Google Colab here.
Conclusion
Python is a pretty versatile tool that can help to automate certain tasks, it can be used to extract and analyze your site’s data and, when used properly, it can help to analyze and improve how our sites are crawled and indexed. I hope you’ll be able to make good use of this tutorial for the next time you use Google’s API index.
Although the API is still reserved for websites that have pages with quick turnover – like job posting sites – it’s still a powerful tool. And maybe, who knows, it could be expanded to more things in the future and this tutorial will prove to be even more useful.


