
A migration is an important and complex project that must be conducted methodically. It can have negative consequences for your SEO if the operation is not carried out correctly.
Making major changes can affect your ranking and lead to a significant drop in traffic.
To schematize a migration, the goal is to move from site A to site B.
Site B generally represents an optimization of site A. For example: migrating a site A in Http to a version B in https.
To prepare site B, it is recommended to work on an “offline” version called a “preprod” or “staging” version. This version is an integral part of the migration exercise in order to be able analyze it before switching from site A to the final site B.
To visualize the different steps, the timeline below breaks down the process and illustrates the method to follow to guide you through your migration.

To avoid problems, planning and rigor must be applied throughout the project.
You’ll begin by crawling your preprod site. This allows you to make technical changes and tests without modifying the production website that is currently live. You can review the website structure, improve page structure or optimize internal linking.
Then, a crawl of the existing site will be useful to list all the URLs and create a redirection plan. By comparing the crawls of the two versions of the site, you can make sure that you don’t forget any pages.
When switching from the old site to the new one, it is recommended to check that the redirects are set up and are working properly, in order to avoid a negative impact on your traffic and SEO.
Afterwards, monitoring the indexing is an important step once the migration is done: using the server logs and a new crawl, you can quickly determine if search engines have taken all your URLs into account.
Finally, you should monitor the evolution of the site post-migration to track its performance.
You can follow the steps below to keep you on track during your migration.
Prerequisites
You need:
- An existing project in Oncrawl with at least 1 crawl
- Some existing segmentations based on Page type, Theme… to have several angles of view of your site
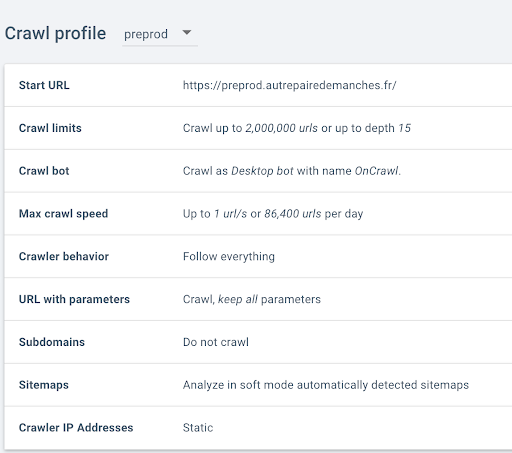
- Crawl profile dedicated to the preprod site
- Follow crawl configuration instructions for each dashboard.
Step 1: Make sure that any problems that can be anticipated are correctly solved on the preprod site.
Many difficulties of a migration can be solved during the pre-production phase. It is interesting to crawl your preprod to check and test certain elements in order to anticipate potential problems during the migration. For example, forgetting to redirect a part of the site or creating redirection loops would be harmful to your SEO.
Set the crawl configuration on the preprod
Preprod sites are often configured to keep them secure. This is why the crawl settings for your production site are not always appropriate for an analysis of the preprod site.
To preserve the set of parameters that are used to crawl your site in production, it is advisable to create a separate profile for your preprod site. You can then modify the behavior of the crawler in relation to the access to the site without impacting your crawl profile on the production site.
- In Oncrawl, create a new crawl profile in the crawl configuration and name it “preprod”.

Specific settings for preprod sites
Often preprod sites block bots — and for good reason: these pages must not be indexed before they are put into production!
It’s quite common to see Oncrawl warn you that the Start URL you specified returns an error. This is the best indication that your preprod site is restricting access to its URLs.
Here are several ways to crawl it:
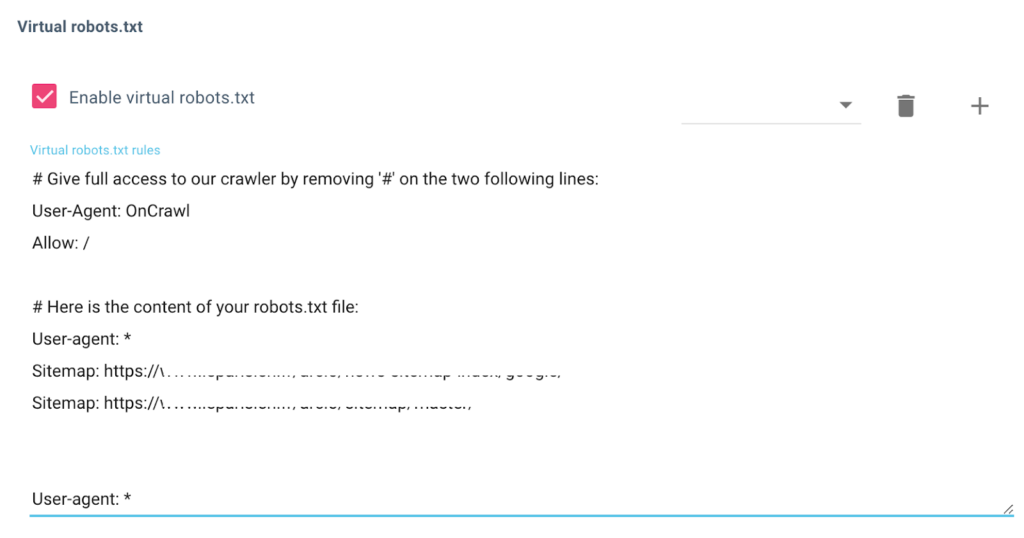
1- Check the virtual robots.txt
If the preprod of the new site blocks the User-Agent: Oncrawl via robots.txt.
Use the virtual robots.txt file to give access to the User-Agent: Oncrawl. It is set in the crawl configuration > extra settings > Virtual robots.txt.
Do not forget to uncomment the lines on the virtual file by deleting the # at the beginning of the line.
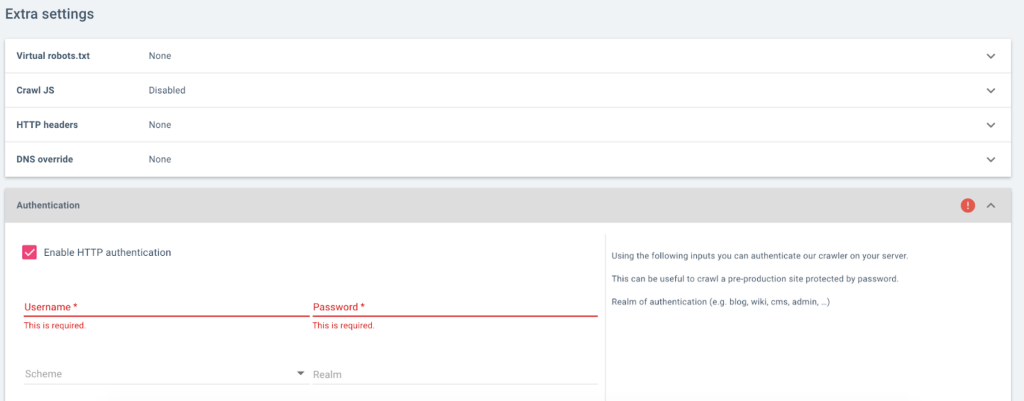
2- Check if authentication is required
If an authentication is required to access the preprod: you have to add the username and password in the crawl configuration in the “Authentication” tab.
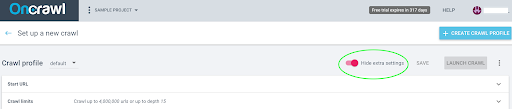
- Remember to display the extra settings.
- Enter the username and password in the Authentication tab.
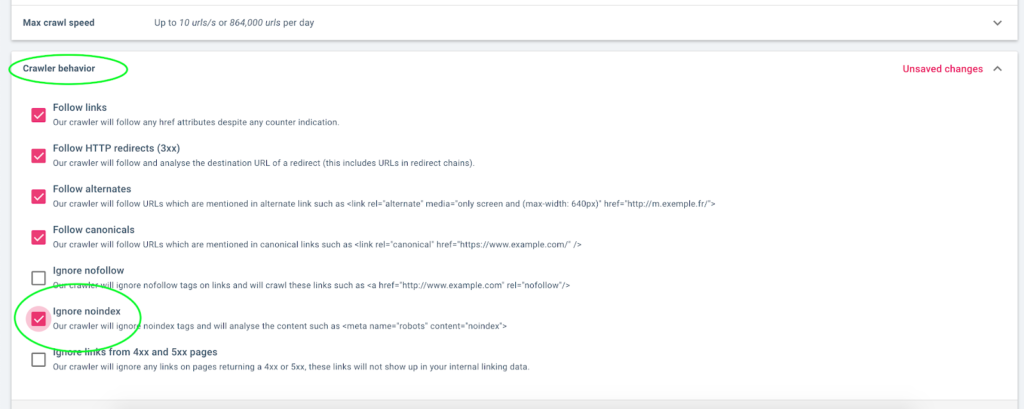
- A Noindex tag blocks the Oncrawl crawler
- Errors 403, 503 or 406
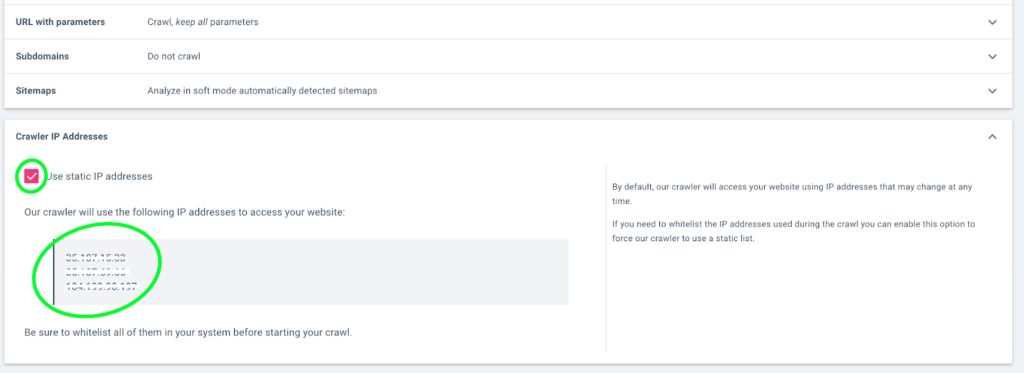
- Oncrawl IP Addresses must be whitelisted to give access to the preprod.
- You must check the static ips option.
- These 3 IPs will be unchanged.
- Make sure the Oncrawl user-agent is green-listed
A noindex tag tells search engines that they should not index this page.
If the home page has a noindex tag: You must set the configuration in the “crawl behavior” tab in the crawl configuration to ignore the tag during the crawl.
The crawler may display the following error :
Error 403, error 503, HTTP status code 406
Error 403 means that the server understood the request but refused to execute it. For the 503, the service is temporarily unavailable or under maintenance. The status code 406 indicates that it is impossible to serve a response that satisfies the “Accept” headers of the request.
In these cases:
Sometimes it is necessary to put the user agent on a list of accepted user agents. For example, if your site is secure, the crawler may not have the default authorization. You should therefore ask your technical team to add the Oncrawl user-agent to this list.

- You can find the default user agent in the crawl configuration.
- You can modify the bot name if necessary.
- If the start url still doesn’t give access to the crawler, you will have to customize the user agent, please contact us via the Chat space on the bottom right.
[Ebook] Technical SEO for non-technical thinkers

Step 2: Validate your Preprod Checklist
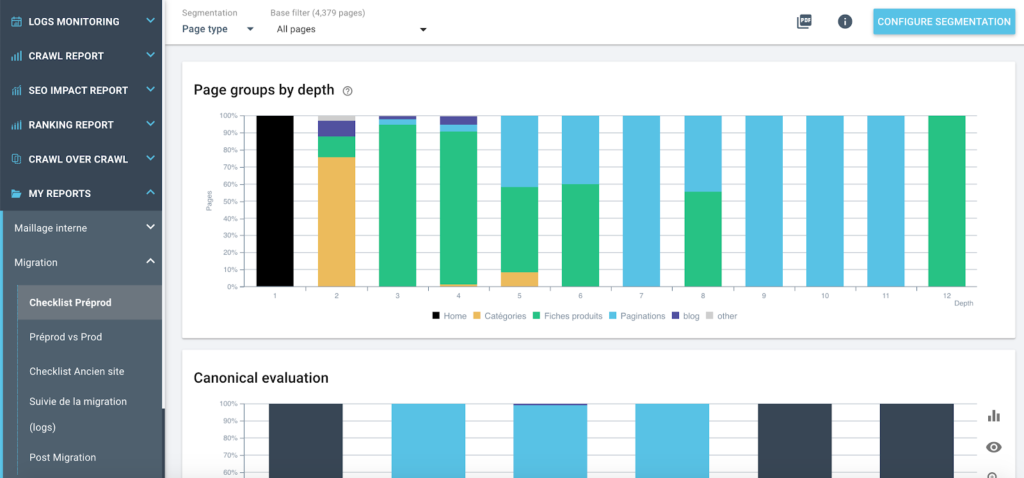
The pre-production checklist serves to avoid common errors and to validate that the basic technical elements of your new site are in line with your intentions. Checklists often include the following elements:
- The structure of your site
- Canonical statements
- Rel alternate statements (hreflang, mobile)
We have prepared a dashboard to validate this checklist based on the crawl you just completed. You can download this dashboard here.
To use this dashboard, you need:
- Use the crawl configuration of your preprod
- At least 1 URL-based segmentation that allows you to visualize the structure of your site
- In order to add this dashboard to Oncrawl, follow the instructions below
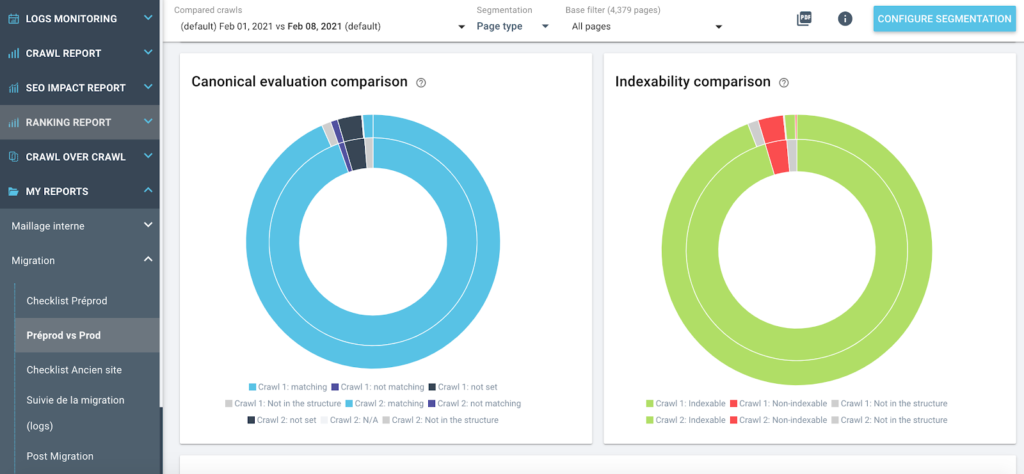
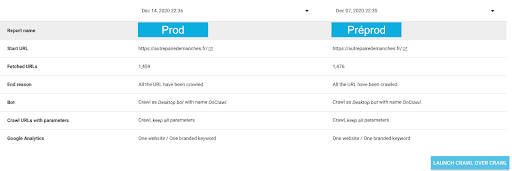
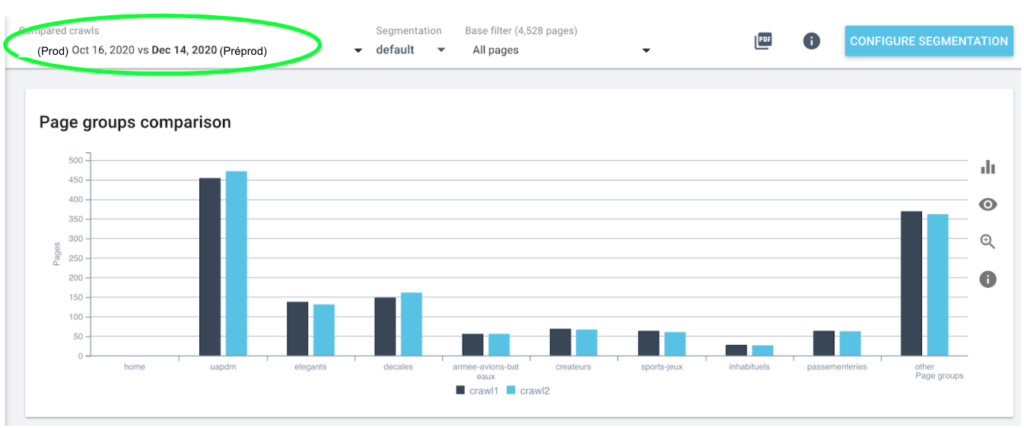
Step 3: Compare Prod vs Preprod
Now that you know that your preprod site is set up correctly, you should compare it with the site currently in production. This step will allow you to verify that the new site includes all the desired pages and features of the current site.
It is particularly recommended to check:
- The number of the pages of preprod vs the prod
- The scope of the new site, which must be identical
By doing so, you also perform a complete check-up before switching to production.
We have prepared a dashboard to compare the old site with the new one, which you can download here.
To use this dashboard, you need:
- At least 1 URL-based segmentation.
- To launch a Crawl over Crawl to compare prod/preprod.
- At least 1 url-based segmentation.
How to launch a crawl over crawl
- Launch a crawl over crawl from the project page
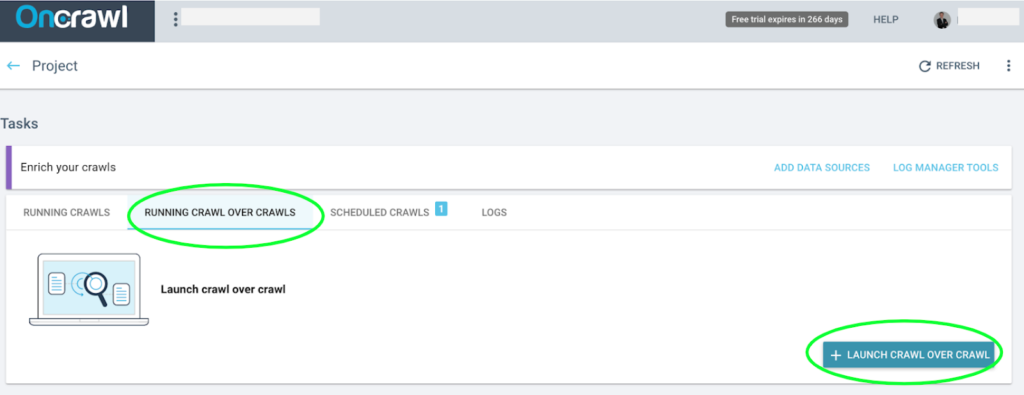
- 2- Choose my Prod and Preprod configuration
- 3- Select the crawl over crawl Prod / preprod in analyses
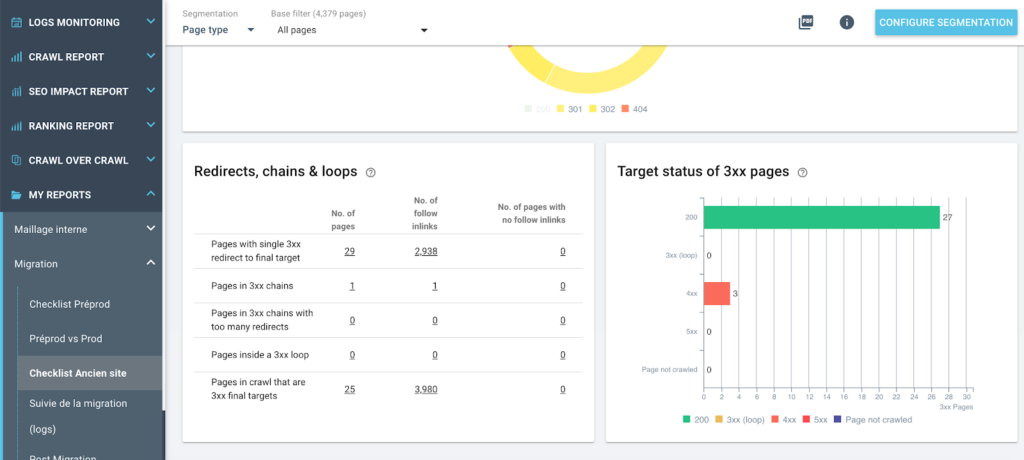
Step 4: Check redirects
At this stage, you must have set up on your preprod site all the redirects from the old URLs to the new ones. This is a key step to a successful migration without losing traffic and rankings.
You can use a crawl only on the old URLs to check for 404 errors and to check the target of the redirects. A dashboard that gathers the necessary information can make this step much easier.
We have prepared one for you. This dashboard can be downloaded here.
To use this dashboard, you need:
- To create a crawl configuration on the list of old URLs
- Site segmentation
Step 5: Launch and monitor the migration
You can now switch your preprod site to prod.
But this is far from being the end of the migration! As soon as the site is live and in production, you have to make sure that Google quickly learns about the new URLs. To do this, you must declare your new domain in Google Search Console. With the redirect plan Google will understand the change.
It is possible to check the status of the URLs one by one in Google Search Console, but we will do it with a crawl and server log tracking. This has the advantages of being fast (data from the Search Console can be displayed with a delay of a few days), of being more convenient when you have a lot of pages, and of allowing you to validate a few other technical parameters at the same time.
To make it easier, you can download this dashboard on the points to check.

To use this dashboard, you need:
- To use the crawl configuration of the new site (after the switch)
- To have a daily upload of log files
This dashboard helps you to:
- Check if Googlebot explores your new URLs
- Performing a sanity check after migration using log analysis
Step 6: Validate the end of the migration
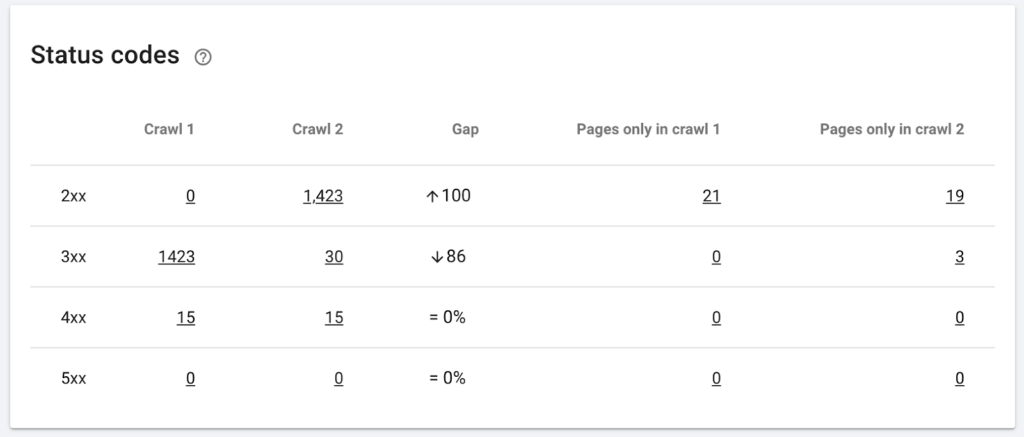
If your site has been correctly explored by Google, the only thing left is to check that the new site in prod is exactly the same as the preprod site.
Be sure to check these items:
- The canonical URLs must be updated with the new version of the site.
- The old site must not have any page that responds with a 200 status code.
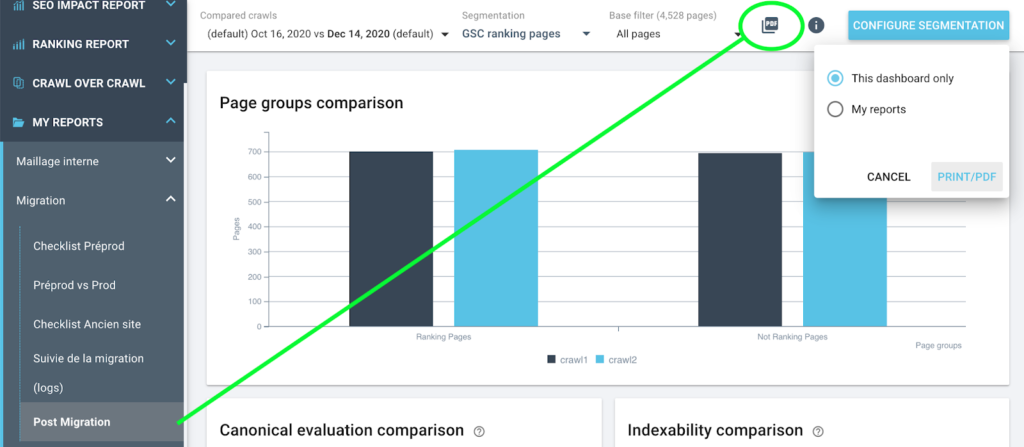
With an appropriate dashboard, you can make a last check.
You can also generate a ready-made report from this dashboard in order to communicate about the migration to your client or your management.
You can download this dashboard here.
To use this dashboard, you need:
- To run a Crawl over Crawl to compare prod/preprod
- At least 1 URL-based segmentation that can be applied to log analysis
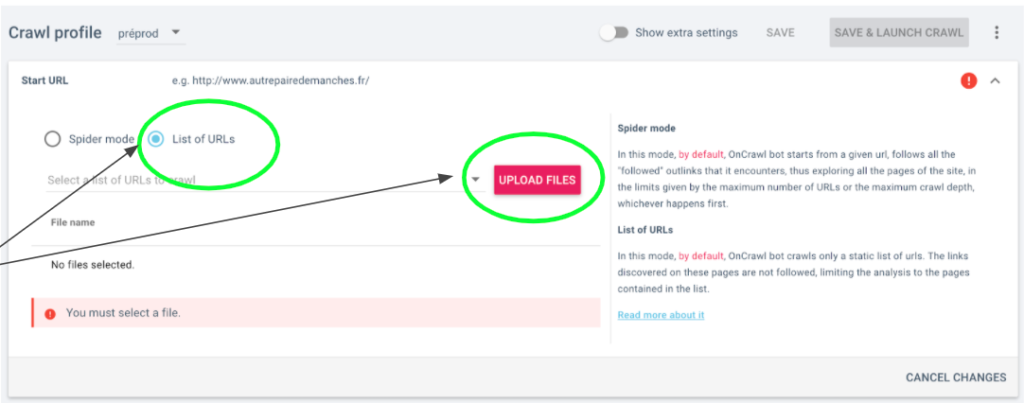
How to launch a crawl on a URL list
- Export all known URLs from the old site (via an old crawl)
- Crawl this list of URLs via a new crawl profile to check that the redirections are set up correctly.
- In the crawl configuration, in the “Start URL” tab select the “URL list” mode and upload your url list.

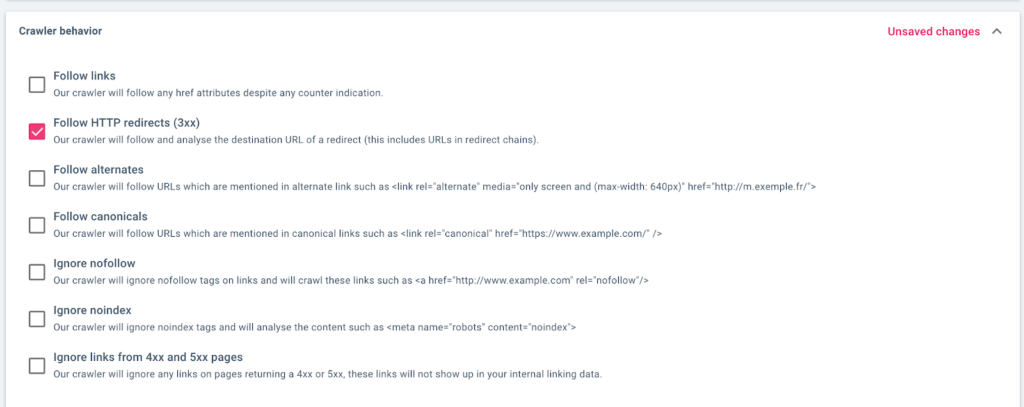
- In the “Crawler Behavior” tab, don’t forget to check the “Follow HTTP redirects” box. (By default, all boxes are all unchecked).

- Launch the crawl ! :)
How to export a list of urls

How to export my report
How to import each dashboard
Focus on the right crawl results during your next migration
A migration is a project requiring a flawless organization to anticipate potential problems that may impact your SEO. You can also use it as an opportunity to perform a complete check-up of your site: A migration can be an opportunity to take stock of the content: remove obsolete pages, merge some pages, rewrite others…
Crawling your preprod and your site will allow you to highlight the existing differences and correct these errors before launching your new site. Once the new site is up and running, it will be important to monitor performance, not only SEO performance, but also other traffic sources and conversions.
You’ll be surprised how smoothly your future migrations will go!