
Thinking about switching to AMP to improve your load time and user experience? That protocol has been designed to help user access more easily the content they are looking for. But before to adopt that protocol, you must be aware of the pro’s and con’s and how to properly implement it. This article aims to provide you an easy guide to switch to AMP on Wordpress for example.
What is Google AMP?
AMP or Accelerated Mobile Pages is an open source project supported by Google and Twitter. It is platform-agnostic because it can be used by any app, web viewer or browser. Google, Twitter, LinkedIn, Reddit and other platforms are currently using it. In fact, the main purpose is to fast the mobile user experience.
AMP consists of HTML, JS, and cache libraries that, thanks to specific extensions and AMP-focused properties, speed up load time for mobile pages, even if they have ‘rich’ content like videos, PDFs, audio or infographic.
AMP is based on lighter coding that let your content be hosted on Google AMP Cache. This cached version actually lets AMP pages to be preloaded and can be then instantly delivered to users for a search results. It also ensures that all AMP pages are actually valid AMP.
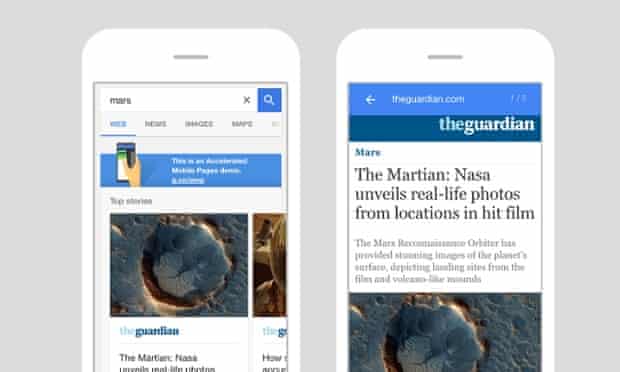
Image source: The Guardian
Moreover, Google has recently updated AMP with two types of optimizations:
- Images: once cached, images will be loaded more quickly. To do so, some meta could be removed or the quality lowered – but without affecting the user experience.
- A Lite version: available from places where the Internet signal is low – allowing to display few informations. Some areas like Vietnam or Malaysia are more concerned but this version will be available worldwide.
Pros and Cons before switching to Google AMP
While AMP seems to be the best solution to improve load time on mobile websites (especially after announcing a mobile-first index) and also user experience, traffic and positions, Google AMP also have a few drawbacks.
Pro’s
- It improves mobile ranking: while AMP is not an official ranking factor, Google is positively pushing AMP content in the mobile results because they have a positive influence on load time ;
- It improves load time: obviously, AMP aims to speed up mobile website performance. AMP pages are fast, lean and minimalist to avoid users to wait for a result. It has a positive influence on bounce rate and traffic ;
- It improves server performance: if the main part of your traffic comes from mobile, AMP will help you reduce the load on your servers and improve their performance.
Con’s
- It has a small set of HTML, javascript and CSS: customization is limited and you cannot add features or widgets. Insertion of dynamic script is also limited ;
- It has Analytic platform restrictions: while Google Analytics is accepted with a different tag, it is not the case for every analytics platform. AT Internet has however a supported tag. You can find the list of tags AMP is supporting here ;
- It has Ad restrictions: while it does support ads, the revenue potential is limited and it is more complicated to insert ads that run on AMP ;
- It is hard to switch back: while you can still do a 301 redirect, it can be more difficult to return to normal if needed.
How to setup AMP for WordPress?
If you are using a WordPress website and are currently thinking about switching to AMP, here is an easy guide to help you go through the install process.
1# Install AMP plugin
Upon activation, you can head over to “Appearance” AMP page to see how your site looks on mobile devices using AMP.
2# Setup template
You can modify the header background, text color and links of the page. The plugin also uses your site’s icon or logo. Then save your changes.
All your post can now be seen as amp by adding /amp at the end of the URL like:
www.mywebsite.com/2017/blog-post/amp/
Looking at the source code of the original post, you will find this line in the HTML:
<link rel=”amphtml” href=”www.mywebsite.com/2017/blog-post/amp/” />
It tells search engines were to go for an AMP version of the content.
3# Customize template
This plugin does not offer a large choice of customization so if you want to add a touch of branding you can add extra plugins.
If you work with Yoast SEO, you need to install and activate Glue for Yoast SEO & AMP. Then go to SEO > AMP page to configure plugin settings.
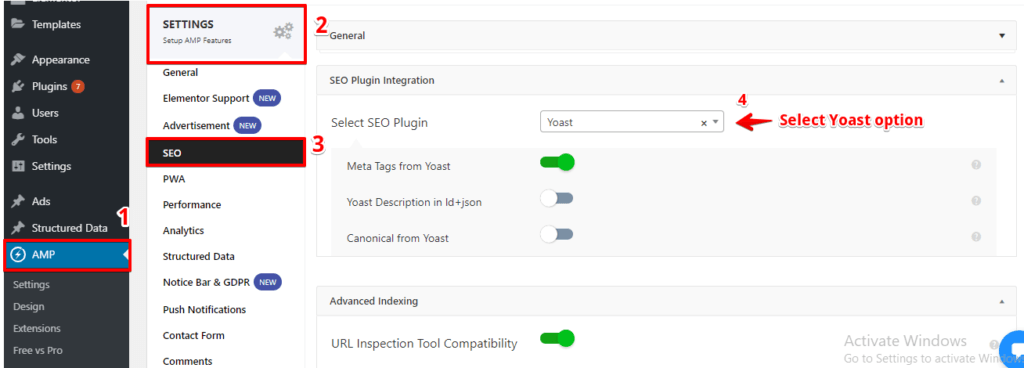
Image source: Glue for Yoast SEO & AMP
The plugin allows you to enable AMP support for other post types.
On the design tab, you can choose colors and design options for content, links and blockquotes.
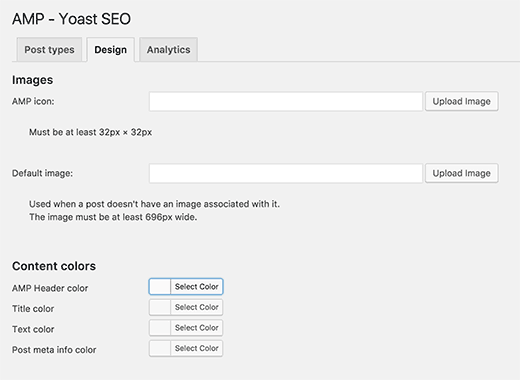
Image source: Glue for Yoast SEO & AMP
The Analytics tab lets you add your Google Analytics ID. Don’t forget to click on the ‘save settings’ button when you’re done with changes.
You can add further plugins for widgets, social media icons, etc but be sure to validate your AMP pages anytime you install any extra plugins.
4# Monitor with Google Search Console
We invite you to check how your AMP content is behaving on Google using the Google Search Console.
You just need to login to your console dashboard and select Search Appearance > Accelerated Mobile Pages. Notice that it can take a while to get updated and see your data.
Also, for further technical insights about AMP and caching, please have a look at that article written by Paul Bakaus.

Must I use a mobile responsive theme for Google AMP?
Thanks for sharing. I’ve never known about AMP until reading this post. The How-to section is really clear to me.